Jan 31, 2011

Shop, Shop, Shop, Shop Around (to the tune of House of Pain)

It's Monday and there's nothing like a great '92 classic to remind you why Irish-Americans are bad rappers gangsta. Enjoy:

I've been shopping around these days for a dream bathroom. Of course, I hate spending money and I love expensive things so "shopping around" for a Markle-Harlan project typically requires more time and energy than most are willing to put into the actual project itself. Fortunately, Mark comes from a frugal family and patiently appreciates my fastidious commitment to getting everything I want, 75% off or more. In my mind, the best bathrooms are classic bathrooms.  They don't have modern lines or granite - they have marble and traditional chrome accents.  If you're going to invest in something like this, it aught to be a worthwhile investment meaning that it aught not to go out of style in 7 years. To avoid such mistakes, I choose to go back in time and opt for styles that are timeless like the one below.  It's kind of like Back to the Future, but in reverse, better, prettier and for bathrooms...so really not like that at all.


Gast Architects: Projects traditional bathroom

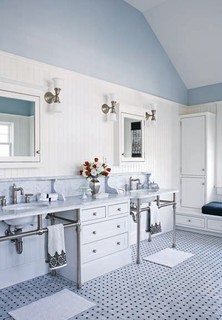
If it's been fashionable since 1920, I feel confident it's not going anywhere soon. So it's console sinks and basket-weave tile for us. Where's all of this going? Oh, in the worst '92 throwback of all: our upstairs bathroom. Sometime ago, there was an individual that believed a blue/hunter green fabricated counter would work well with lime green walls, an etched glass shower door, a stumpy "modern" toilet, rusty vanity lights and cheap 4x4 ceramic tiles. It's classy folks, I tell ya. I'll save the "before" shot for a later post, but many of you know first-hand the terror that awaits you at the top of the stairs. Thus far we've made the following decisions and purchases:

1. Replace the glass door with a curved shower rod with an extra tall shower curtain that's ceiling height.  We hope this will make the room feel taller and "grander" ... whatever that means. We've purchased the shower rod, the curtain liner and an extra-tall shower curtain. Total Cost: Free. We used Amazon credit from previous used-book sales to pay for these items.
 2. A console sink. These puppies are pricey! After two months of searching, I was able to purchase the American Standard Retrospect for $300 on Craigslist.  She came to us in a new box, never opened and retails (top plus stand) for about $680.


3. Of course, sinks need faucets and I am a sucker for Belle Foret faucets. They're perfectly vintage.  I fell in love with the one pictured below, but didn't have the $282 to shell out. Fortunately I found a seller on eBay carrying it for $75 and that included shipping.  Shipping was important because these faucets are known for being quite substantial and heavy, so our package weighed in at 18lbs.
4. Basket weave tile floors. The ceramic tiles have got to go. I originally was happy to settle on another porcelain floor option available at Overstock.com for $6.20/sq foot. Then I walked on a carrara marble basket weave tile floor.  There is simply no turning back.  Go big or go home. I'm already home, but you know what I mean. We stepped into Architectural Ceramics near McClean, VA this Saturday and received a quote of $24/sq foot. No thank you. Have no fear, I went home and so far I've been able to find online retailers with great reviews for only $9.99.  Yes please.  No purchases have been made yet, we want to be sure we're not putting the cart before the horse with this purchase since our bathroom isn't big, but it's not small either.
5. A new toilet.  Sexy, I know. Our current toilet looks a little truncated.  It's whatever Japan thought was the hippest in 1985 and it uses 3.5 gallons of water with every flush. Yikes. That's not very green of us. So after hitting up Architectural Ceramics, we walked in this fancy-schmansy hardware store nearby just to dream. Faucets in there started at $680 just to put things in perspective. We certainly weren't planning on purchasing anything.  Then we found a beautiful toilet that was "last season" according to the store owner. Heaven forbid! A season old toilet! As a result, it was marked down from $600 to $100 dollars.  And she's a beauty.  I never thought I could speak to the aesthetic quality of a nice toilet, but let me tell you...this one is nice. It's not the Porsche of toilets, but I love the flush fixture on the side.  This picture shows the fixture in solid chrome, but ours has a porcelain middle.

We still need to find a new light fixture (I believe I've convinced Mark to switch to classic sconces...they look traditional and are better for applying makeup) and a new mirror but we're making progress!

Jan 28, 2011

Color Recap

The big reveal is coming soon, don't worry.  We are still debating where we want to drill the knobs.  It seems that the trend is to drill them about 2.5-3" down the panel.  Here are some shaker cabinets with a similar look:

white blue kitchen traditional kitchen
custom island traditional kitchen

See what I mean? So anyways, while we determine that stop for a moment and remind yourself of our three kitchen colors...then suggest what fabric colors you would bring in to make the space a little cozier.

The walls are Glidden's Smooth Stone:
...and the cabinets are Sherwin Williams' Escape Gray:
...we've also got a boat load of white trim, and white Silestone countertops:

Then we've got travertine tile floors that look something like this:
I. Need. Warmth. I know what you're thinking...just where is this fabric going to go? Answer: All kinds of places! I need a rug, window treatments on two windows and we're turning that awkward bar/semi-island into an adorable built-in dining nook that will require pillows and seat cushions. One thing is for sure, I know I want an "eclectic mix" of fabrics.  That is, I want a few different patterns that "go" but aren't mitchy-matchy.  It's not 1998 and this isn't the Gap.  The problem is that my thoughts are all over the place and I can't pick my main squeeze fabric.

Should I go all soft and paisley?
Mod and Dwell-studio-ish?

Or do I go somewhere in-between?
One things is for sure...the options are endless.  Somehow I'll incorporate a stripe into the mix and probably manage to sneak in a small bit of geometric pattern even if it isn't the star of the show. 

Jan 15, 2011

Special Delivery!

Joy oh joy. We've got mail. Two great deliveries occurred in the last 48 hours and no, Kara hasn't had Reagan yet. First, my sweet parents sent us a brand-spanking-new paint sprayer. Check this baby out!

Frank says thanks, too! The timing couldn't have been better, either.  Our new doors also arrived!

We are happy with the details we chose. As much as the traditional shaker-style cabinet works with our home's 1926 birthday, we really feel like the added details will give the cabinets an extra bit of character.
We had the doors pre-drilled for the new hinges and ordered our hinges directly from the door manufacturer to ensure a proper fit.  Our old cabinets had wobbly, outdated hinges that fell off-track too easily.  We're not hinge experts, but these look like they'll hold up pretty well.
I got so excited to see our new cabinet doors, that I went ahead and took our existing doors off while Mark ran to Sherwin Williams to pick up our Escape Gray.  Tomorrow we'll empty out the cabinets, sand everything down, and clean up the dust.  This will include a much-needed clean up of the cabinet interiors. We're thinking that it may be wise to line them with contact paper, but we haven't made up our minds about it just yet. Any suggestions? We're too lazy to re-paint the interiors, so don't bother suggesting that. P.S. Do you think we like Oatmeal Squares?

Yes, that's my husband cooking me breakfast for dinner. He's the best. The kitchen is once again in shambles, and there's no turning back.

Green machine

After the Cascade Green fail (see the cabinet on the far left), we knew that finding the perfect color wasn't going to be easy. I know, we should have figured that out before our third trip to a paint store but no one said we were fast learners.
(Hi Frank!) We went back to Sherwin Williams today to pick out the perfect shade of green-gray and left with four additional samples. We've learned that colors never look the same in the store on a swatch as they do painted in our home. We painted the cabinets and were surprised to realize that all four selections were better than any of the previous four.  We were honing in on our sweet-green-spot. I know, the tension is overwhelming...

After much debate, we checked our final decision to ensure there was enough contrast between our Smooth Stone walls and (drum roll).... Escape Gray! Here's a close-up of what we're talking about:
It's green. It's gray. It's light. It looks like it belongs in an old home and it will look great with our shaker cabinets. Mark drove back to S-Dubb's later in the day to purchase a gallon of the goods.  Sure, we spent about $45 on paint samples but the money (well) spent has two great outcomes: first, we know we're painting our cabinets a color that we'll love and second, if anyone has a small project in mind that requires green paint, I've got 8 pints for you to pick from. You're welcome.

Jan 13, 2011

The winner fails

After Mark ran out to our local Sherwin Williams to find our Cascade Green, he slapped it up next to the other samples and we both agree that it's just not gray enough.  This thought came from the guy that for three months refused to believe that gray was a good color. Now we're back to square one.  We've got four painted cabinets and nothing to show for it.  Saturday we're headed back to the S-Dubbs, with paint samples in-tow, for a final shot at the perfect green cabinets.

Jan 10, 2011

And the winner is...

After receiving a lot of feedback (thanks, Everyone!) about the three cabinet colors below, I've decided on something entirely different. Sorry! My mom sent me this color and let's just say she knows me well. Ladies and Gentleman, I present to you Sherwin Williams' Cascade Green:
Not too dark, not too gray, just right. Thanks for sharing, Mom!  Lucky me, I went to find a store nearby and stumbled upon a $10 off coupon.  Enjoy!

Jan 9, 2011

Cabinets are in the mail!

I've got the FedEx tracking number in hand! Our new cabinet doors are estimated to arrive on January 14th.


We can't wait to get going on this project and painting will be a lot easier than expected with the sprayer my dad is shipping to us. We're almost finished with the kitchen!  We still need to add crown moulding and paint the cabinet bases, but we're so close to the finish line that it's hard not to get excited. We thought we were sold on the color-matched Kitchen Maid cabinets, but now we're having doubts.  I picked up two additional samples and put them on our existing cabinets to get an idea of how they'd each look. What are your thoughts? If this were your kitchen with your bright white Silestone counters and your off-white, almost gray-brown tile floors what color would you pick?

I know what you're thinking and yes, white does look nice.  It doesn't look nice when there are three different shades of competing white (counters are bright white, floors are off white, and cabinets are white) in one kitchen and no warmth in the floor.  If we could afford carerra marble counters and wide pine floors, I would be all about a white cabinet.  But that's not the case, so we're working with what we've got. Thanks for your help, everyone!

Kitchen Remodel: Post #3

In order to accomplish priming, painting or adding crown moulding, we first had to remove the odd leftover wall above our new fridge. Here's a quick reminder of what that bad boy looked like:

I must admit, I was a bit nervous heading into this project.  Demolition is no problem.  I spent two weeks doing just that to homes destroyed by Katrina. I love demolition. It's the rebuilding/patching/making pretty part that had us both a little anxious.  So anxious, in fact, that once the wall was down we called my dad in a panic asking him to fly up here. Of course, we quickly realized that joint compound and spackle aren't that scary and now we've got a much more open kitchen to show for it.  Here's the start of the demolition:


I thought Mark had everything under control at this point so I went upstairs to put away laundry. A few moments later I heard, "Laurie, you should get down here.  This is so cool and will make for a great picture on the blog!" Out of the remaining duct work there was a pesky nail that wouldn't come out and Mark was sawing it off with a Dremel.  Sparks were flying everywhere, his face right next to the blade, with no goggles to be found.  I screamed, told him to stop and asked him where his goggles were, to which he replied, "I don't need goggles.  My eyes are beautiful." Exactly. Fortunately I got my way and he got back to sawing.  He was right, it did make for a really cool picture...of sparks flying at his face.
Then it became time to patch the walls. It was no big deal until everything dried and sanding began. Being the novices that we are, we didn't think to tape off the room and air ducts. We thought wrong. Very wrong. Our kitchen is drafty and that draft tends to move the air out of the kitchen and into the dining room. Mix a fine powder into that air, and you've got an impressively dirty home. So on day two we learned from our mistakes and taped our doorway and vents.

The air in the kitchen was caustic, but the rest of the house was no worse for the wear. We also learned a lot about joint compound and spackle.  I think the most important lessons include: over filling the holes to create a smooth wall by sanding, sanding with long strokes, and waiting for everything to fully dry before you sand. Also, if you're a first timer like us, we totally recommend the DAP Pink-to-White spackle.  It goes on pink and dries white, which kept us from constantly poking our wet spackle to check if it was dry. We also used Glidden's Pink-to-White ceiling paint with great ease.  It kept us from re-painting areas that didn't need it and knowing just how well the paint was covering (or not covering) the ceiling.

After we sanded, primed and painted, we walked away with an imperfect, but good enough, wall above our fridge.


That's not all we've managed to do, either. All of the walls are now painted in Glidden's Smooth Stone and we couldn't love it more. We could love the weather more.  Apparently if your exterior walls are less than 50F, paint doesn't dry correctly and peels off in sheets. Space heaters came to the rescue, but not before I exchanged a few "adult words" with the walls that I just finished a second coat on. FYI: the ceiling isn't trimmed in the above pic because we're adding the 4.5" crown moulding. The tile next to the fridge is also officially repaired. Thanks to Bo's help, of course:

The tile project really stretched Mark.  He had to bust out a lot of existing tile, move pieces around and learn how to retile a floor. I'm pretty proud of him for doing such a great job.  The finished product is seamless. In addition, all of the trim and doors have been given with a fresh coat of white, I knocked out that awkward shelf above the island (we plan to put built in cabinets up there) and repaired the wall, and we managed to rig a recessed can light over the sink into a hanging pendant light. Check out my sheer brawn:
The can light was interesting for a few reasons.  First, we thought we could use an adapter kit that they sell on TV, but our model was too old.  Then when we talked with the helpful folks at Home Depot they basically gave us a useless answer, so we created our own solution that involved a blue plastic electrical box and some 2x4s cut to make a bridge that held the box flush with the ceiling.

Most interesting was the discovery of construction waste inside our cabinets. Once we pulled out the can light, we found a variety of sheet rock, wood and debris tucked up in the built-out ceiling:

Frank really loved the exposed wires hanging from the box.  Like all good parents, we let him play with live wires and grabbed the camera.  Isn't he the cutest?


Here's the pendant, semi-finished.  We still need to paint the ceiling around it and caulk the decorative medallion to the ceiling (we had to add it to cover up the giant hole the can light left).


So there you have it folks, you're officially up-to-date on our kitchen remodel and yes, in case you're curious, we're exhausted.

Jan 1, 2011

We're officially open for business

I promised an update on the guest bedroom so here goes:
Removing Noah's Ark and painting seemed easy enough, so you would think that getting window treatments up wouldn't be so hard, right? Wrong. Where does time go? The great deals I snagged on window treatments (2 blinds, 2 curtain rods and 4 curtain panels for less than $100. Yes, please.) didn't seem to give us enough motivation to actually hang everything.  Finally on the most productive day of 2010 (Dec. 30th in case you were curious), we got to hanging. Except hanging sounds like we were doing something exciting like rock climbing when really I'm blogging about curtain rods. Wow...
So here it is in all of its guest-worthy glory:


Newly on display is this beautiful antique letter press that Mark gave for Christmas.
I'm not a fan of the orange lamp or the outdated fan, but both will have to wait while we tackle the larger projects in our home. Namely the sudden leak in our kitchen ceiling. Yes, that's right over our bathroom sink. No, I'm not going into details in this blog post. Yes, I will get around to it once I meet with the granite counter estimator tomorrow. It's a fun story full of hangovers and ebay, quite possibly the most incredible combination ever.

The guest room budget breakdown:
  • Paint and Primer: $50 at Ace Hardware
  • Bedding: $90 at Target.  The coverlet was on sale!
  • Bed and Dresser: Given to us by my parents.
  • Side table: Given to us by Scott and Katie (Mark's brother and his super talented wife).
  • Window treatments: $100 at Target and Home Depot
  • Chair: $32.50 ($3 at Goodwill for the chair, $18 at Target for the pillow case, $5 foam, $3.50 for staples and $3 for upholstery tacks that I didn't use but opened and therefore can't return. I already had the spray paint.) Read more about this project.
  • Rug: $120 from OneKingsLane.com. If you aren't a subscriber, you really should be. We actually store our clothes in closets outside the master bedroom to avoid waking each other in the mornings. This room is mine and stepping on this super plush rug each morning is a total treat.
  • Picture Frames: I purchased the yellow frame at Target to match the pillow and the portraits on the wall for only $3 in their dorm decorating section, the other two frames were gifts.
  • Antique portraits and frames: These were inherited from my maternal grandmother and I love them.
  • Grand Total: $395.50. Considering this budget included paint and blinds, I'm not terribly disappointed. I'd like to squeeze in a bit more style for $400, but the room looks clean and comfortable and it has a very "guest room" feeling. Not that I would know, since I'm not one. Which brings me to my next point: when are you coming to stay with us?
Next up I'll be sharing with y'all how my husband actually tried to take his eyes out just for this blog and how we knew it was time to call the plumber.  How does every small project (like calling a plumber) lead to a larger, more expensive project (like new bathroom counters and faucets)? Thank goodness we love our home.